I hand-kneaded bread dough every Saturday for about eight years. My wrists knew it. My loaves did not. Some came out fine. Plenty came out dense, gummy in the center, or with a crust that gave up before I even sliced it. The problem was consistency. Human hands get tired, and tired hands rush the knead. When I started using the KitchenAid Artisan Series 5-quart stand mixer with its dough hook, the loaves got better almost immediately. Not because the machine is magic, but because it kneads at the same speed and pressure every single time, for as long as the recipe needs. That is the one thing a tired human cannot do.
This guide walks through the exact process I use for a basic artisan bread, from mixing flour and water to pulling a finished loaf out of the oven. Follow the steps in order. The most common mistakes happen because people skip a step or rush a resting period. The mixer handles the hardest part. Your job is to not get in its way.
If your bread keeps coming out dense, the problem is probably your kneading, not your recipe.
The KitchenAid Artisan 5-qt stand mixer with dough hook kneads at a consistent speed for exactly as long as your dough needs. No tired arms, no under-developed gluten. Check today's price before you mix another batch by hand.
Amazon Check Today's Price on Amazon →What You Need Before You Start
Bread is not complicated, but it is unforgiving about a few things. Before you touch the flour, have these ready: bread flour (not all-purpose, the higher protein content matters), instant yeast, fine kosher salt, water at roughly 95 to 100 degrees Fahrenheit, and a kitchen scale. Measuring by weight is not optional if you want consistent results. A cup of flour can weigh anywhere from 120 grams to 160 grams depending on how you scoop it. The dough does not know what cup size you used, only how much flour is actually there.
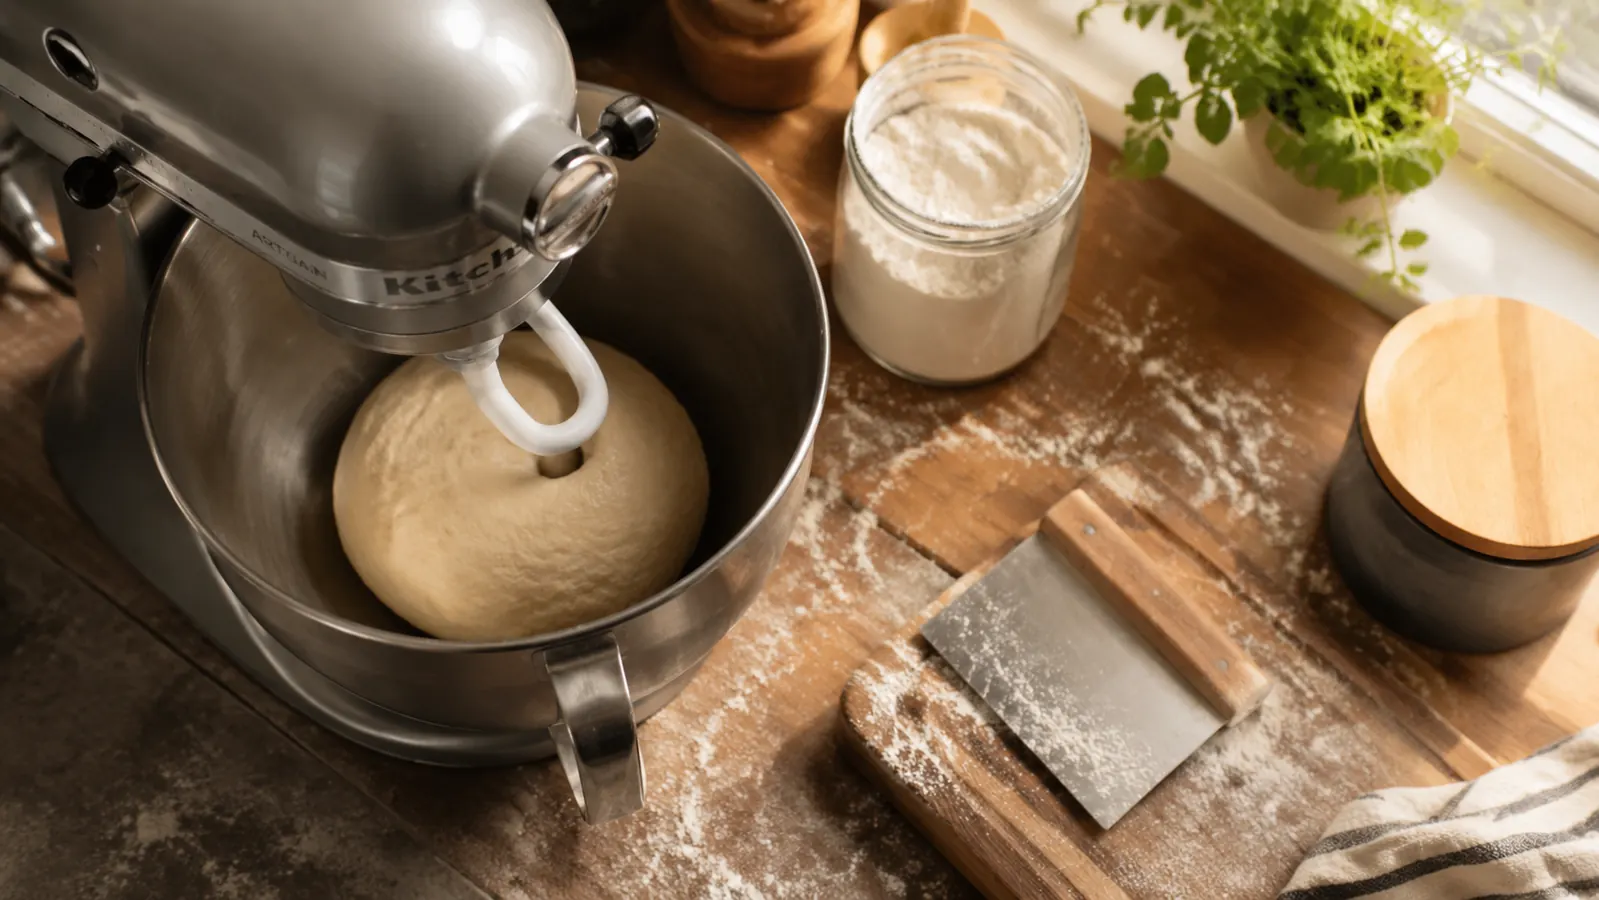
You also need your KitchenAid fitted with the dough hook. This is not the flat beater attachment and not the wire whip. The dough hook is the thick, curved C-shaped one. If you have the pour shield that comes with the Artisan, snap it on. Flour dust on speed 2 will drift upward and settle on everything nearby if you skip it. I learned this the hard way and still find flour on my spice jars weeks later.
Step 1: Measure and Combine Your Dry Ingredients
Place your Artisan's stainless steel bowl on a kitchen scale and tare it to zero. Measure 450 grams of bread flour directly into the bowl. Add 9 grams of fine kosher salt and 7 grams of instant yeast. Give the dry ingredients a quick stir with a dough scraper or spatula to distribute them. Do not let the salt sit directly on the yeast for more than a few seconds. Salt slows yeast activity. Mixing them separately into the flour before adding liquid sidesteps this entirely.
If you are working with active dry yeast instead of instant, you need to proof it first in about two tablespoons of the total water with a pinch of sugar. Wait until it foams, roughly five to eight minutes, then proceed. Instant yeast can go straight in. I keep instant yeast in my freezer and have never had a failed activation in three years of weekly bakes.
Step 2: Add Water and Mix to Shaggy Dough
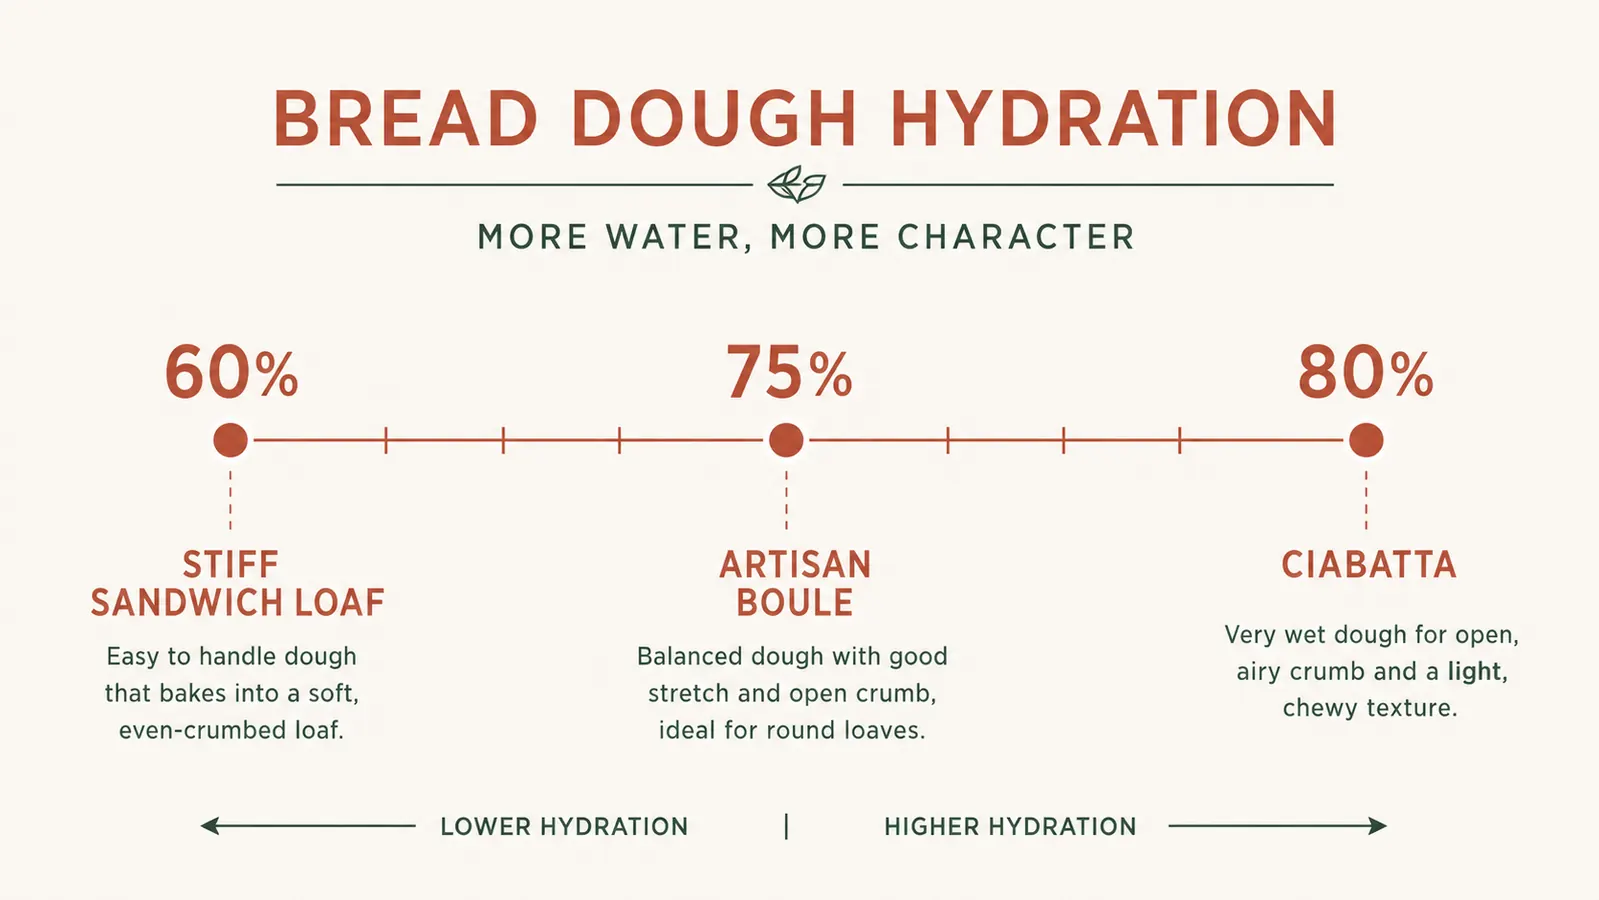
Measure 320 grams of water at 95 to 100 degrees Fahrenheit. That is roughly 71 percent hydration, which gives you a dough that is workable but not sticky enough to frustrate beginners. Pour the water into the bowl with the dry ingredients. Fit the dough hook, lock the head down, and turn the mixer to speed 1. Let it run for two minutes. What you will see is a shaggy, rough-looking mass pulling together. This is normal. Do not add more water yet.
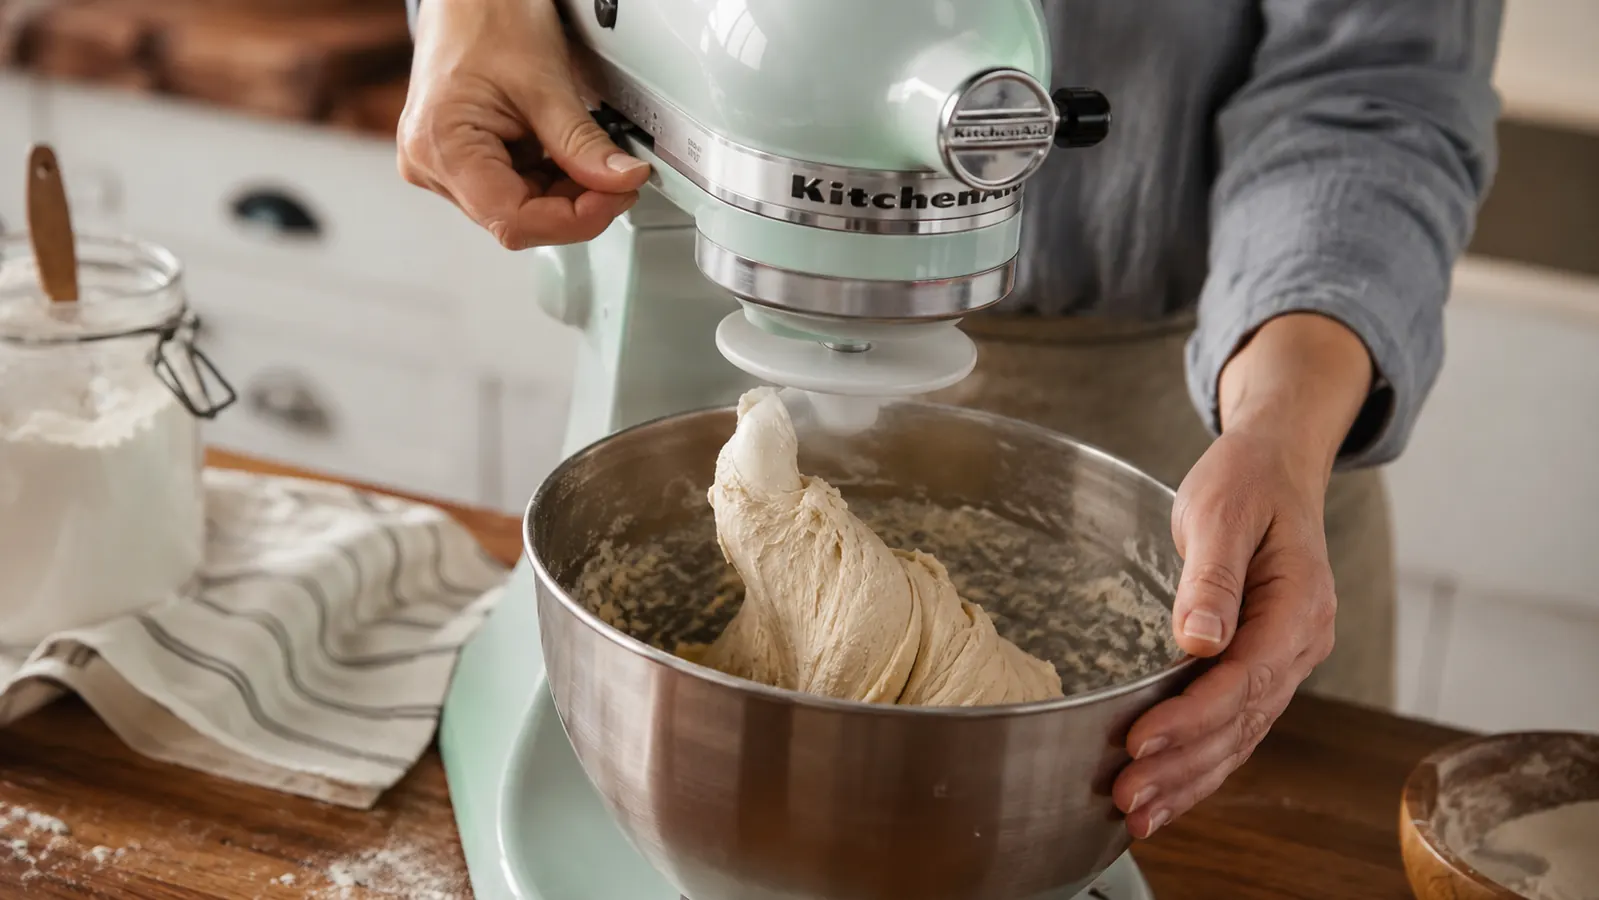
After two minutes on speed 1, increase to speed 2. The Artisan's owner manual recommends speed 2 for yeast doughs, and that recommendation is correct. Speeds higher than 2 can over-stress the motor on a stiff dough and will heat the dough from friction, which hurts gluten development. Speed 2 is not slow, it just looks slow compared to what you expect from a stand mixer. Trust it. Let it run.
Step 3: Knead for 8 to 10 Minutes on Speed 2
Set a timer for eight minutes and walk away. This is the part where the machine earns its spot on your counter. The dough hook will work the dough against the sides of the bowl, folding and stretching continuously. Around the three-minute mark you will notice the dough starting to clean the sides of the bowl and gather around the hook. That is gluten network forming. By minute six, the dough should be smooth on the outside and pulling away from the bowl walls cleanly.
At eight minutes, stop the mixer and do a windowpane test: pull a golf-ball-sized piece of dough, stretch it slowly between your fingers toward a light source. If it stretches thin enough to see light through without tearing, gluten development is sufficient. If it tears quickly, run the mixer another two minutes and test again. A dough that passes the windowpane test is a dough that will rise properly and hold its structure in the oven.
The windowpane test is the one check you actually need. If the dough tears when you stretch it thin, it needs more time on the hook. Every other bread-baking trick comes after this one.
Step 4: First Rise (Bulk Fermentation)
Lightly oil a large bowl, about twice the size of your dough ball. Transfer the dough from the mixer bowl (a bench scraper helps here), form it into a rough ball, and place it in the oiled bowl. Cover tightly with plastic wrap or a damp towel and set it somewhere between 72 and 78 degrees Fahrenheit. Cold kitchens make for long rises. Warm kitchens speed them up. A turned-off oven with just the oven light on holds a consistent temperature around 75 degrees and works well in winter.
The dough needs to double in size. At 75 degrees with a healthy yeast dose, this typically takes 60 to 90 minutes. Do not judge by clock alone. Judge by size. A dough that looks doubled is ready. One that has barely grown after two hours probably had dead yeast or water that was too hot and killed it. If you are unsure about your yeast, proof it first every time until you trust your supply.

Step 5: Shape, Second Rise, and Bake
Turn the doubled dough out onto a lightly floured surface. Press it gently to degas it without punching or tearing. Shape it into either a round boule or an oval batard, depending on your baking vessel. For a boule destined for a Dutch oven, fold the edges into the center, flip it seam-side down, and use your hands to build surface tension by dragging the ball toward you in short strokes. For a loaf pan, flatten the dough into a rectangle, roll it tightly, and place it seam-side down in a greased pan.
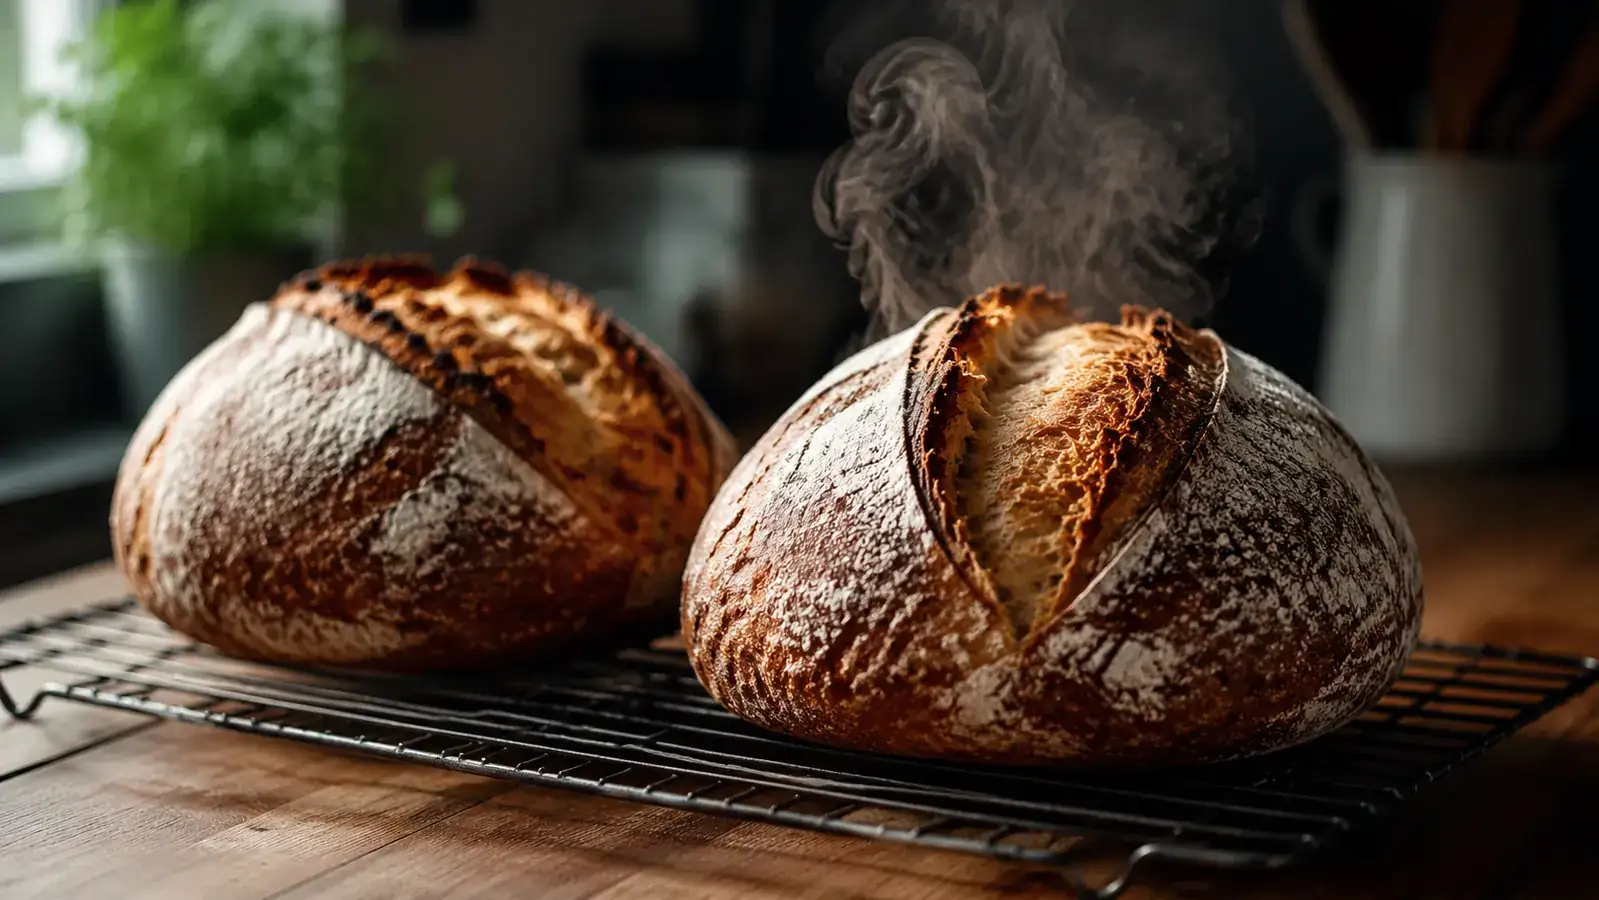
Let the shaped dough rise a second time, covered loosely, for 45 to 60 minutes. It should puff noticeably but not fully double. Meanwhile, preheat your oven to 450 degrees Fahrenheit with your Dutch oven or baking vessel inside. That preheat needs a full 45 minutes to get the cast iron thoroughly hot, not just warm. Score the surface of the dough with a sharp knife or bread lame just before it goes in. A single slash at a slight angle down the center works for a batard. A cross-hatch or spiral works for a boule. Scoring gives the loaf a place to expand rather than blowing out the side.
Bake covered for 20 minutes, then uncover and bake another 20 to 25 minutes until the crust is deep golden brown. Do not open the oven during the first 20 minutes. Steam trapped under the lid is creating your crust. Opening the door releases it. Pull the loaf, tap the bottom. It should sound hollow. Let it cool on a wire rack for at least 45 minutes before cutting. Cutting too early traps steam inside and turns the crumb gummy, which is the fate of every loaf I have ever rushed.
What Else Helps
The KitchenAid Artisan handles kneading reliably, but a few additional tools make a consistent difference in the final loaf. A kitchen scale is the single most useful thing after the mixer itself. An instant-read thermometer takes the guesswork out of water temperature and also helps you confirm doneness in the bread. A finished loaf should read 200 to 210 degrees Fahrenheit at the center. A Dutch oven or covered baking vessel is almost essential for a good crust at home. If you are baking sourdough or want to go deeper on the vessel question, I have covered the Lodge Double Dutch Oven in detail in my review of it for bread baking. It is what I reach for every bake.
Bread flour over all-purpose makes a real difference in loaves where you want chew and structure. All-purpose flour works, but the gluten network is weaker and the windowpane will develop more slowly and tear more readily. If you bake bread more than twice a month, buying bread flour in a 5-pound bag is worth it. You will notice the dough on the hook behaving differently: tighter, more elastic, cleaner on the bowl walls.
If you want to understand the mixer itself before committing, my three-year review of the KitchenAid Artisan covers what holds up, what wears out, and how it handles heavy doughs over repeated use. You can find it at KitchenAid Artisan Review: Three Years of Weekly Baking Sessions. The short version: the tilt-head lock gets loose over time on stiff doughs, but every other component on mine is still working exactly as it did the first week.
Eight years of hand-kneading taught me one thing: consistent pressure and timing are what your hands cannot give but a stand mixer can.
The KitchenAid Artisan Series 5-quart with dough hook runs at speed 2 until your gluten is fully developed, every single time. Check today's price on Amazon and see why it has nearly 23,000 reviews from home bakers who bake bread every week.
Amazon Check Today's Price on Amazon →